FlyClock Key Features
FlyClock is a timer tool for fullscreen PPT/PDF presentations, compatible with Microsoft Office PPT, WPS Presentation, and various PDF files:


1. [Smart State Synchronization]
Timing starts when presentation begins and stops when it ends. Deeply senses PPT and PDF
presentation mechanisms, eliminating any manual switches so you can focus entirely on your
delivery.
2. [Exceptional Stability] Never
absent in critical moments. Underlying window‑topmost and layer rendering technologies ensure
the timer interface remains clearly visible and never obscured in fullscreen or dual‑screen
environments.
3. [Non‑Intrusive Experience]
Leaves no traces, fully customizable. No need to modify original documents; the timer window
floats lightly, supports free resizing and dragging, and blends perfectly into your visual
background.
4. [Remote Dynamic Control] Perfect
collaboration inside and outside the venue. Assistants or back‑office staff can adjust, pause,
or reset the timing progress in real time over the local network, allowing the presenter to
focus on delivery while keeping overall rhythm under control.
5. [Minimalist Workflow] Focus on
the core, get started instantly. Abandons complicated configuration items; the feature layout
closely follows real presentation and rehearsal processes. From countdown setup to style
selection, the operation logic is clear and intuitive, enabling rapid pre‑meeting
deployment.
Quick Start
1. Download the program and install it following the prompts.
2. Double‑click the program to run it.
3. Open a PPT/PDF file, go fullscreen, and timing starts immediately.
4. To adjust duration or other settings, right‑click on the FlyClock window and configure as
needed.
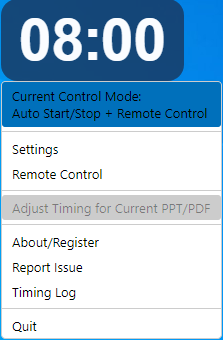
Basic Usage
1. Move the window: Hold the left mouse button and drag the window.
2. Display the menu: Right‑click on the interface.
3. Show the window: If the window is hidden, right‑click the FlyClock icon in the system tray
(bottom‑right corner), then click "Show".
4. [Quit] is disabled during presentations to avoid accidental operations.
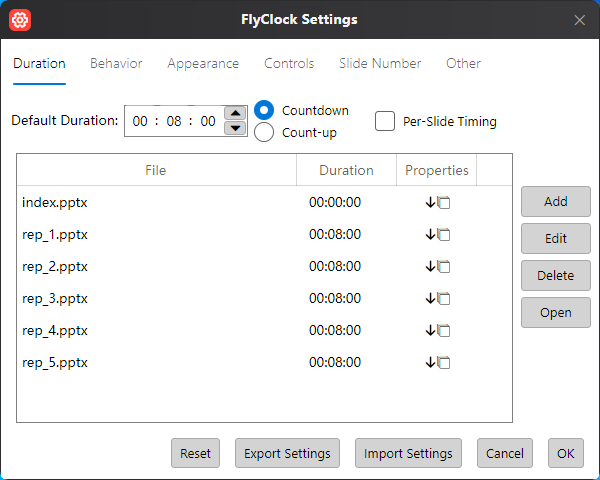
Set Duration
Where to find
Two ways to set duration:
1) In [Local Settings], you can adjust the default duration and
optionally add files to the list.
2) In [Adjust Timing for Current PPT/PDF], directly set
the duration for the already‑opened file.
Duration Setting Method 1
1. Default Duration: If no individual file setting exists, the system uses this duration.
2. Count-up / Countdown: Default timing modes; can be set per file.
3. Per‑Slide Timing: Timer resets automatically on each slide change (requires page‑number
plugin; see “Page Number Display” section).
4. Add, Edit, Delete: Independently set timing properties for documents; also supports batch
operations (hold Ctrl to select multiple files).
5. Open: Directly opens a file from the list using the system default program (if page‑number
function is not enabled, files set via method 2 may not open).
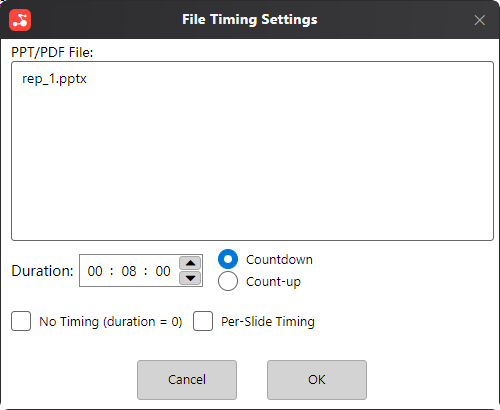
Duration Setting Method 2
When a recognizable document is open, right‑click and [Adjust Timing for Current PPT/PDF] becomes available. Click to open the quick‑setup dialog. After confirmation, the file and its settings will appear in [Local Settings] → [Duration Settings].
Behavior Settings
From software startup to timing start, then to approaching the end, and finally to timing expiration — each stage can be customized to your preference. Below are the relevant settings.
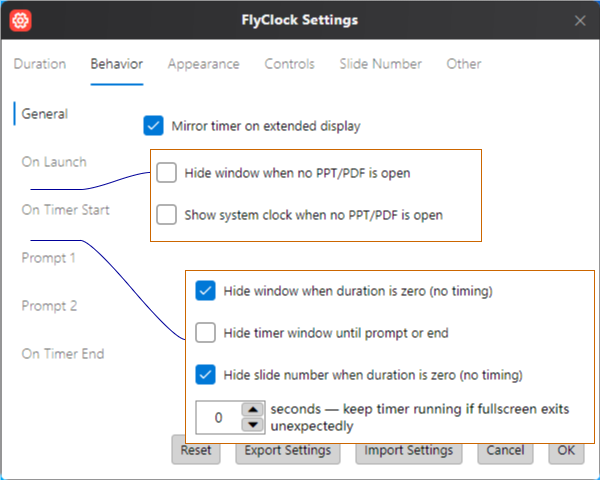
1. Global Settings
Should the timer be shown on extended displays? Default: “Show”.
2. On Launch
The timer is already running, but not yet in fullscreen presentation mode. If no document is open for timing, you can choose to hide the timer or show the current system time (like a clock).
3. On Timer Start
When you start the slideshow and the document enters fullscreen playback, timing officially begins:
(1) If the duration is zero (e.g., an agenda PPT that doesn’t need timing), you can hide the window.
(2) To reduce presenter pressure, you can hide the timer until the preset prompt time approaches, then display it.
(3) Showing page numbers (if enabled) on agenda slides may be unnecessary — you can choose not to show them.
(4) If the presenter accidentally exits fullscreen during a live presentation, a grace period can be set. If the presentation re‑enters fullscreen within that time, the timer will not restart.
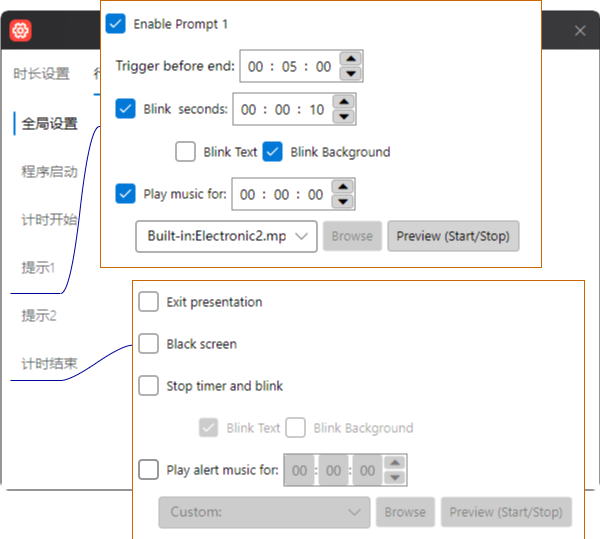
4. Time Prompts
When the presentation time is about to end, you can use prompts to help the presenter control the pace. Two time nodes can be set; when reached, prompts are given via font/background blinking or music playback.
Blink frequency can be adjusted in [Appearance Settings].
If the music duration is set to 0, the music will play fully once and then stop. If a duration is set, the music will play for that duration; if the track is shorter, it will loop.
5. On Timer End
When the presentation time expires, besides showing an overtime status, you can choose from several overtime control methods:
(1) Strictly control time by ending the fullscreen presentation directly.
(2) Go further by blackening the screen.
(3) Friendly prompt: only blink text and background.
(4) Play music to alert the entire audience.
If the music duration is set to 0, the music will play fully once and then stop. If a duration is set, the music will play for that duration; if the track is shorter, it will loop.
Appearance Settings
FlyClock supports full customization of appearance, including color schemes, window size, fonts, etc. Changes are not applied immediately; all adjustments take effect when you click [OK] to close the settings window.
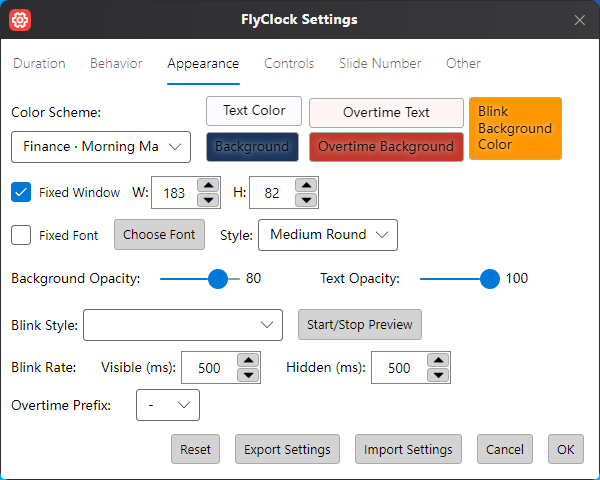
1. Color Scheme: You can directly use preset schemes or customize as needed. Colors usually need
to be set separately for the normal timer state and overtime state
(foreground/background).
2. Size & Font: Adjust window size and set fonts:
If you fix only the window size, the font size will
automatically adapt, and vice versa.
Note: If both window size and font size are fixed, displayed
content may be clipped.
When testing, pay attention to the display after the timer
ends, because the overtime prefix increases the width of the displayed characters.
3. Opacity: Foreground and background opacity can be set independently, solving grayscale issues
caused by single‑opacity settings.
4. Blink Style: Choose different styles and preview them live.
5. Blink Frequency: Set the blink interval for the window’s background and foreground. It is
recommended that the sum of “visible” and “hidden” durations divides 1000 evenly for better
integration with the timer seconds.
6. Overtime Prefix: After the timer ends, if the time is still displayed, you can add a prefix
symbol (e.g., “+”, “Overtime”). Leave empty to use no prefix.
Control Settings
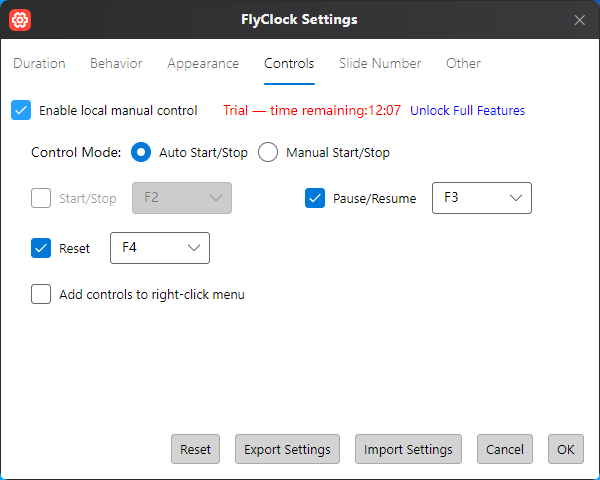
Here you can enable local manual control, including Start/Stop Timer, Pause/Resume, and Reset
Timer.
Note: If “Manual Start/Stop” is enabled, the automatic start/stop feature will be
overridden.
Page Number Display
FlyClock can display the current page number of PPT/PDF documents.
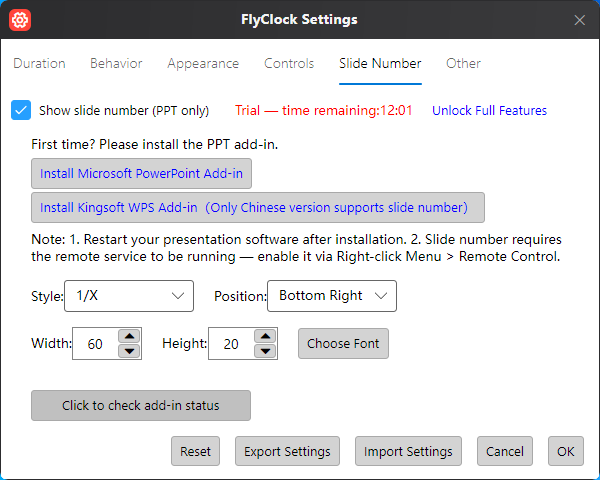
Note: The interface differs between Windows / macOS / Linux. On Windows, WPS Presentation
(only the Chinese version; the international version is not supported) and Microsoft PowerPoint
are supported. On macOS, Microsoft PowerPoint and Apple Keynote are supported. On Linux, WPS
Presentation (only the Chinese version) is supported.
Note: On Windows/Linux, the page number display plugin is required for “Per‑Slide Timing” and
“Remote Operation”. Without it, these features will not work.
The position, height, and width of the page number display together determine its exact location
on the screen.
Remote Control
FlyClock is highly automated: after setting parameters, it automatically provides timing reminders based on PPT/PDF progress. However, unexpected situations such as leader interruptions or the presenter not starting on time can arise during meetings, making moderate human intervention very necessary. Remote control is designed for this purpose.
1. Access: Right‑click and select [Remote Control].
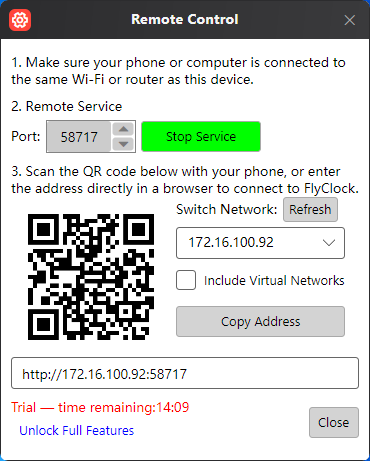
2. Remote control can be achieved via a mobile phone, tablet, or another computer, provided all devices are on the same network as the computer running FlyClock (e.g., connected to the same Wi‑Fi).
3. Use any HTML5‑compatible app or browser (such as WeChat, Quark) to scan the QR code, or directly enter the connection address in a browser to access the remote control interface.

4. In the remote control interface, you can view and control timer operations in real time. Click the operation button corresponding to a timed file to reveal further control options, including Open/Start Show/Close. The [SOS] button sends virtual ESC and close window commands to the host for emergency handling.
About/Register
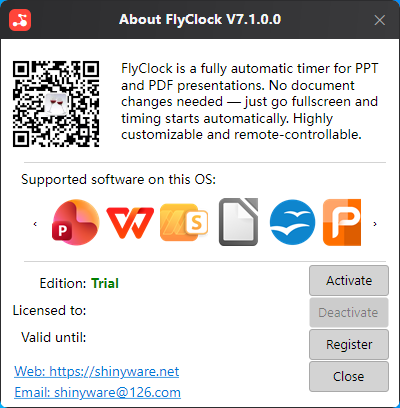
When unregistered, FlyClock may occasionally show this window during operations; it will not
appear during active timing.
Click [Register] to be guided through registration. Please choose the appropriate edition
according to your needs.
After registration, go to “About/Register” and click [Auto Retrieve] to activate automatically,
or manually enter the registration information from the email to activate.
After successful activation, you will see green license information in this window.
If you no longer use the software, click [Deactivate] in “About/Register”.
Report Issue
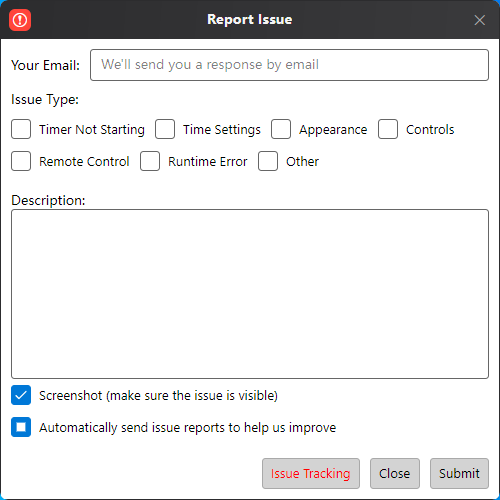
When you encounter a problem, open [Report Issue] in the context where the issue occurs, enter your email and other information, and submit. We will process it promptly upon receipt.
If the issue is complex, you can first click [Issue Tracking], then reproduce the problematic operation, and finally re‑enter the Report Issue window and click [Submit]. This will send us more detailed debugging information (we do not record any of your personal information), helping us locate the problem.
Timing Log
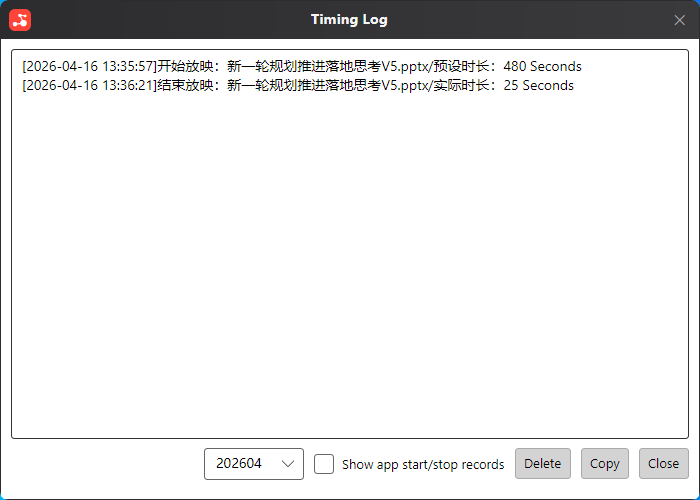
FlyClock records all program start/exit times, as well as the start/end times of timing for each document, completely in this log.
Other Settings
Software Reset
When FlyClock’s configuration file encounters unexpected issues, you can use the “Software Reset” function in the [Settings] window to restore the initial state.
Export/Import Configuration
Use this function when you need to migrate your configuration between different computers.