Basic Usage Method
Quick Start

1. Download the latest software from our website and install following the prompts.
2. Double-click to run the program.
3. Open a PPT/PDF file, press F5 (PPT file) or Ctrl+L (PDF file) for full-screen presentation (can also be operated by mouse). Timing should have started.
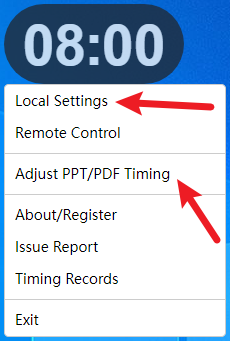
4. To adjust duration and other settings, right-click on the FlyClock window and configure as needed.
5. If you need more control during use, please use the remote control function.
Basic Operations
1. Move Window: Hold left mouse button and drag the window.
2. Show Menu: Right-click on the interface.
3. Show Window: If the window is hidden, right-click the FlyClock icon in the system tray at the bottom right of the screen, then click "Show Window".
4. [Exit] Not Available? Please exit presentation mode first, then the [Exit] option in the right-click menu will become available.
Setting Timer Duration
Access Methods
There are two ways to access duration settings:
1. In [Local Settings], you can adjust default settings and freely select files to add.
2. In [Adjust Current PPT/PDF Timer Settings], directly set the duration for already opened files.
Duration Settings Method 1
1. Default Duration: If no individual file settings exist, the system automatically uses this duration.
2. Count Up/Count Down: Default timing method, can be set for individual files.
3. Per-Page Timing: Timer automatically resets when changing pages (requires page number plugin installation).
4. Add/Modify/Delete: Independently set timing characteristics for related documents, can operate multiple files at once (hold Ctrl to select multiple files).
5. Open: Directly call system function to open files from the list.
Duration Settings Method 2
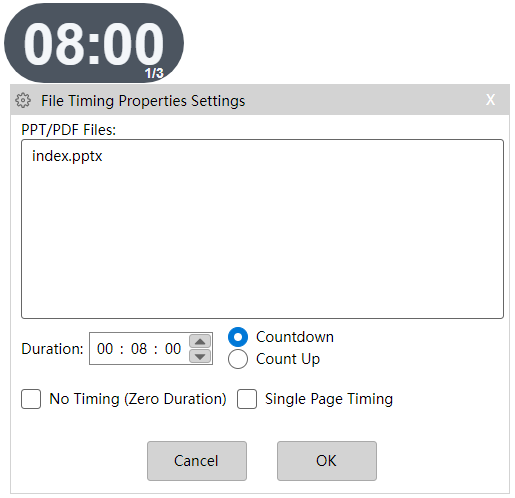
If there's a recognizable document, when you left-click, [Adjust Current PPT/PDF Timer Settings] becomes available. Clicking it opens a quick settings dialog. After confirmation, the corresponding file and settings will appear in [Local Settings | Time Settings].
Behavior Settings
From software startup to timing start, then to near completion, approaching end, and finally to time expiration, we have behavioral requirements for the timer at each stage. This is where you configure these settings.
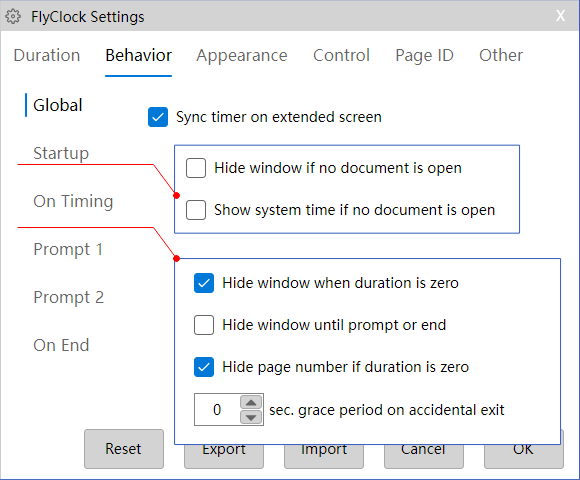
1. Global Settings
Should the timer be displayed on extended screens? Default is to display.
2. Program Startup
At this point, the timer is running but not yet timing in full screen. During this stage, if no timing documents are open, you can hide the display or show machine time (like a clock).
3. Timing Start
When you click play and the document starts full-screen presentation, timing officially begins:
(1) When timing duration is zero (e.g., agenda PPTs that don't need timing), you can hide the window.
(2) To reduce pressure on presenters, maybe initially you don't need to show the timer, only displaying it when time is running out.
(3) For agenda PPTs, displaying page numbers may be meaningless - you might want to not display page numbers.
(4) During formal presentation, a presenter might accidentally exit full screen, causing timing to restart unexpectedly. You can set a time window here - within this time, exiting and re-entering full screen won't restart timing.
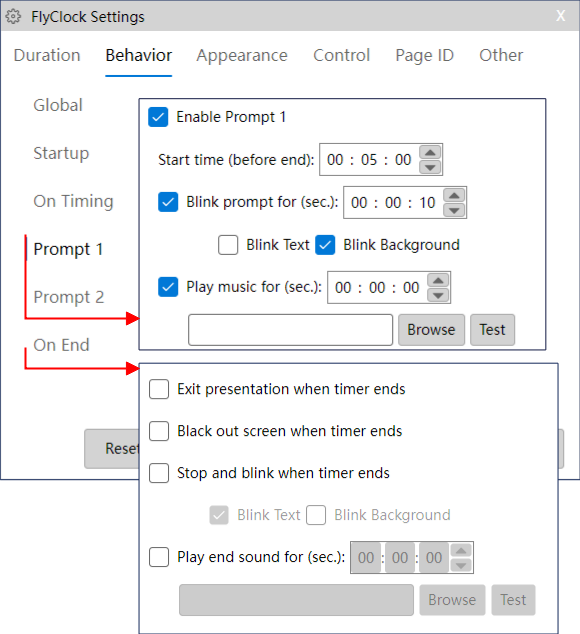
4. Time Alerts
When the scheduled presentation time is running out, you should want to alert the presenter to control time. Here you can set two alerts - when time is up, it will alert through font or background flashing, and music to remind that presentation time is ending.
Flashing frequency can be adjusted in [Appearance Settings].
When music play duration is 0, music will play completely once then stop. If you set a duration, music will only play for that long, looping if the music is shorter.
5. Timing End
When the scheduled presentation time ends, besides overtime display, you might want to control overtime presentations in various ways:
(1) Strict time control - directly end full-screen presentation.
(2) Go further - black screen.
(3) Friendly operation - just flash text and background for alerts.
(4) Add some music to alert the entire venue.
When music play duration is 0, music will play completely once then stop. If you set a duration, music will only play for that long, looping if the music is shorter.
Appearance Settings
FlyClock allows free customization of appearance, including colors, size, fonts, etc. After selecting and confirming, related settings won't take effect immediately - they will take effect when you click [OK] to close the overall settings window.
1. Color Scheme: You can directly select mature color schemes or set personalized colors according to your needs. Colors generally need to be set for foreground and background colors for normal timing and overtime.
2. Size & Font: Here you can adjust window size and set fonts:
If you only fix window size, font size will be automatically calculated, and vice versa.
Note: If both window and font sizes are fixed, displayed content might be clipped.
When testing, pay attention to the display state after timing ends, as prefixes will increase display character width.
3. Transparency: Can make the window blend with the background to some extent. Background transparency will only show fonts, so under this setting, please ensure foreground color contrasts with PPT/PDF background color, otherwise display won't be obvious.
4. Flash Frequency: Duration settings for window background and foreground flashing. Recommend flash and hide durations that can divide 1000 evenly for better integration of flashing with second counting.
5. Overtime Prefix: When timing ends, if time is still displayed, a symbol is added before the time - this symbol is the overtime prefix. If set to empty, no prefix is used.
Control Settings
Here you can enable local manual control, including start/stop timing, pause/resume, and reset timing.
Page Number Display
FlyClock can display the current page number of PPT documents, but this is limited to Microsoft PowerPoint.
Note: The page display plugin is essential for per-page timing and remote document operation. If the plugin is not installed, these features will not work.
When installing the plugin, please follow the prompts. The position, height, and width of page display together determine its specific location on the screen.
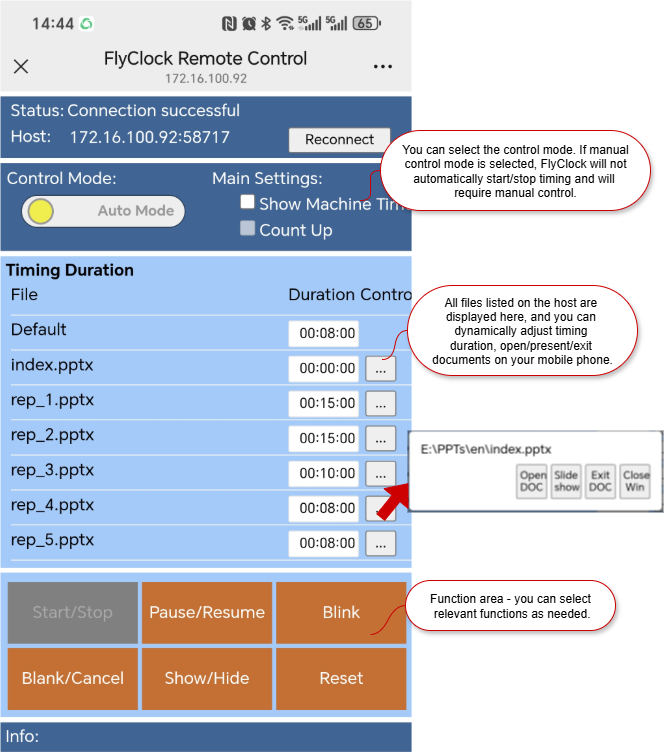
Remote Control
FlyClock has high automation - after setting operating parameters in advance, it automatically times and reminds based on PPT/PDF. However, sometimes meetings have unpredictable situations, such as leader interruptions, presenters not starting PPT on time, etc. In such cases, appropriate human intervention becomes necessary. This feature exists for this purpose.
1. Access: Right-click and select [Remote Control].
2. Remote Control Requirements: Can be achieved through phones, tablets, or other computers, but the basic requirement is that these devices can connect to the same network as the computer running FlyClock, for example, through the same WiFi.
3. Connection: You can use WeChat, Quark, or other HTML5-supported software or browsers to scan the QR code or enter the connection address to access remote control.
About & Registration
When unregistered, FlyClock will occasionally pop up this window during operation.
When clicking register, it will guide you through registration - please select the appropriate version according to your needs.
After registration, you will immediately receive an activation code via email. Click activate and enter relevant information to activate.
If this machine will no longer use this software, please click [Cancel Authorization].
Additional Features
Problem Report
When you encounter problems, please click Problem Report in the problem scenario, enter email and other information for feedback. We will handle it promptly after receiving it.
Timing Records
FlyClock's entry/exit times and each document's timing start/end times will all be displayed here.
Software Reset
When FlyClock configuration files have unexpected problems, you can use the software reset function to restore the initial state.
Configuration Export/Import
When you need to transfer configurations between different computers, you can use this function.